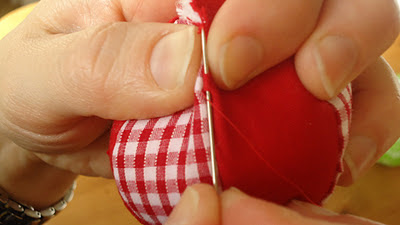
From my very first fruit I was aware that I was not possessed of the proper knowledge to sew an invisible seam when sewing up the stuffing gap, so I proceeded clumsily, stitching as closely and neatly as possible to finish off.
When my mother-in-law was visiting the other week and I was frantically busy with all the fairs, I was finishing off some more pincushions as I had sold nearly all my stock (in spite of the badly sewn seams). I asked Grannie Magpie if she could show me a better way to close the gaps and she taught me this method. (I'm sure it has a proper name but I'm too lazy to find out what it is, perhaps you can enlighten me?)
I had previously been putting the needle in one side of the gap, then putting it through the adjacent fabric.
What you are meant to do is make a tiny stitch along the seam line, putting the needle in and out of the same side in one stitch.
Pull through.
Then, you repeat the action on the other side; make a tiny stitch along the seam line.
And then pull through, thus drawing the gap closed.
Repeat all along the gap, alternating sides as you go, pinching the sides together with the seam allowance tucked under.
Et voila!
The apples have a button sewn onto their bottoms (with the stitches going right through to the top) as this helps to make the apple shape and stop the pincushion falling over.
And the the finished fruit!
The garden gang, ready for their new homes.
Thanks for stopping by,
Beth x


How clever I never knew that!!, so thank you for sharing, will definately try it out next time
ReplyDeleteSophie xx
I just received one of your pincushions as a birthday present and wanted to tell you how lovely it is. Thanks. You should get some twigs, learn to make a partridge (or acquire one from somewhere - perhaps learn to felt one) and create a partridge in a pear tree for your next craft fair at Xmas.
ReplyDeleteHi, I'm glad you like the pincushion. Thanks for the idea about the pear tree, it's great! Also have looked at your website, what beautiful hats x
ReplyDelete